There will be occasions when you will want to retrieve data from Chris21 that show specific calculations. Calculated Fields can help you to achieve this.
You might be asked to project a salary increase for a group of employees for budget purposes. In this example, you will need a calculated field to add the salary increase and show the increased salary in your report.
To start, create a new report and add the required fields from the Salary (SMN) form using the Field Chooser:

Then open the Calculated Fields window by clicking the button circled below.

Now create your calculated field. Click the New button to start:
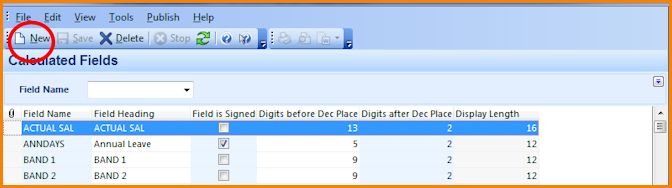
In this example we will create a calculated field that increases the annual salary by 4.5%.

To create the calculated field do the following:
Name your calculated field. This can be any name that best describes the calculated field but you only have 12 characters to work with. I have called this one SALCALC.
Name the Field Heading. This can be any name that best describes the field name. This will be shown as the column heading in the report output. I have called this one Salary + 4.5%.
Enter the Field Code. Choose the appropriate field code from the Data Dictionary. In this example I am creating a calculation that will increase the annual salary so I have selected the Annual field from SMN. To do this, click on the button on the Field Code to open the Field Chooser:

From the Field Chooser, open the Salary form and double click the Annual field.

Select the Operator. This tells the system what type of calculation is required. In our case it is the asterisk * character that will multiply the Annual salary by whatever value is entered in the Value field.
Enter the Value. We want to enter a calculation that increases the salary by 4.5% so we need to enter 1.045.
Result Format. Use this area to specify the length of the field, including decimal places.
Save the record. Click the Save button to save the calculated field.
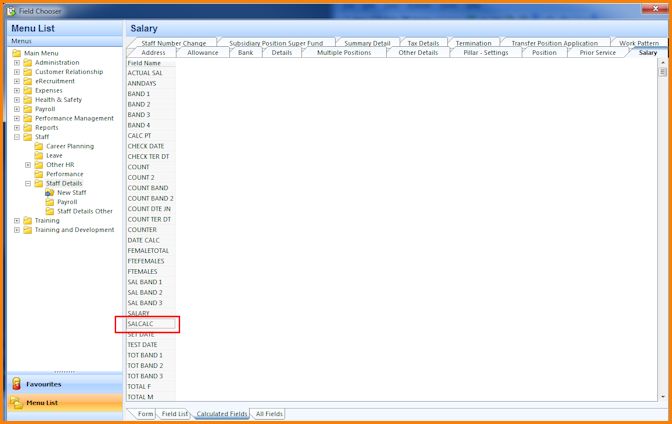
Now we need to add the calculated field to our report. From the Report Designer window open the Field Chooser:

Access the list of calculated fields by clicking the Calculated Fields tab at the bottom of the Field Chooser form:

Locate the calculated field that we created from the list shown below. Double click the Field Name to add this calculated field to your report.
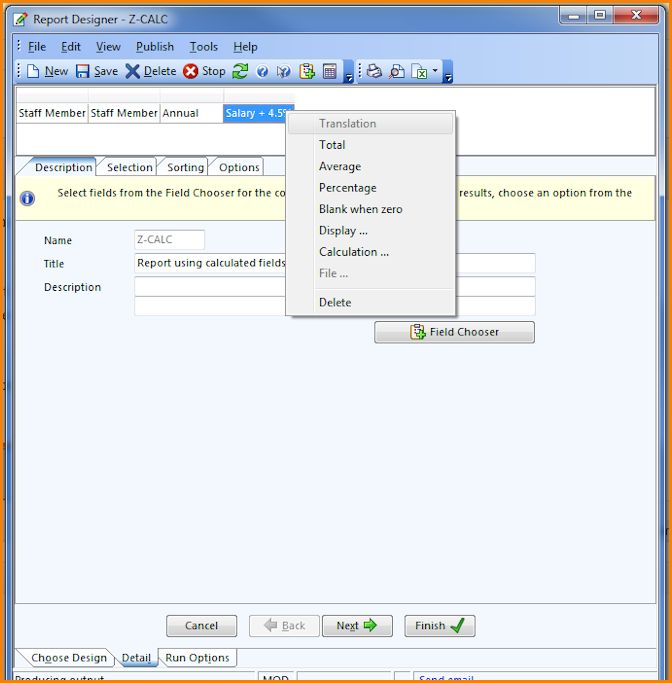
After double clicking the Calculated Field in the Field Chooser, it now appears as a field on your report.

If required, we can now set the Properties for our calculated field. To do this, right click on the calculated field name. You will see a number of options on the pop up menu. These options can be used depending on the requirements of your report. For instance, choose the Average option if you want to show the average salary after the 4.5% increase by department. In our report we don’t need to set any properties so ensure that all options are unchecked.
Our report is now complete. Publish the report to Excel and you will now have an entry in each row showing the projected 4.5% increase in salary for all employees.
This is one quite simple example of how you can use calculated fields to enhance your reports. Once you are comfortable creating this report, you will find it easier to experiment with other scenarios to create some very useful reports.
Have a try at this and check the results. If you have any difficulties, questions or even examples of calculated fields you have used let me know by leaving a comment.
I have used a calculated field for TIM records. One of the reports I ran had a total for each Timesheet, then a Grand Total. I don’t know what I did different, but now when I run it, even from a brand new report, I only get the Grand Total.
I also note that the calculated fields do not work when the output is to Excel, only in PDF. Is there any way to remedy that?
Hi Jenni. Make sure the Hours field (assuming you are totalling hours) is set to Total. You may also need to have a break on your report to give the sub-totals.
Thanks Toni, I was missing the Break. Is there any way to run a report like this to Excel and have the breaks show? Seems like it doesn’t work?
Hi Jenny, were you able to export the calculated field in excel?
Hi Tony,
I was working on a Chris Report and wanted an output file wherein the column has a hardcoded value in one of the field name. For eg: A First Aid expiry date report wherein the SkillLevel= “10” and CourseCode =”First Aid” has to be hardcoded as it will always remain the same. I don’t want to change this manually after the excel is generated with my selection criteria. Is there a way to solve this ?
Would be great if we have this kind of functionality in Chris21.
Thanks a lot for your help.
Soma
Hi Soma,
Could you just add the Course Code to the report? Use selection First Aid and only First Aid records will appear in the Course Code column. I don’t think there is a way to add hard coded values, except maybe using a calculated field.
Regards,
Tony.